Check it out...

Friday, October 30, 2015

Color Play Friday - Christmas Ornaments


Working on the draft all week, finished but forgot to press Publish, ugh!


Good Morning Hon,

It's Fridayyyyyy!  Whoop whoop!

I have been looking forward to this week's Color Play Friday the most so far!  Why you ask?  Because it involves my favorite time of year.  I get to look at some wonderful Christmas fabric.  This week's photo belongs to Lorinda.  She blogs over at Laurel and Pine.  Oh, wait, if you are not sure what Color Play Friday is hop on over to here, where Lorinda's explains it all (I've done so in previous weeks, but I'll do quick description page to, later).

As I said this week's color play gives me a chance to get into some Christmas fabric.  Squealllll!  I know, I know, we haven't even gotten through Halloween or started on Thanksgiving yet.  Of course, if you listen to the stores you started Christmas back in August.  You know I love any reason to dress up in costume, and I have a lot to be thankful for, butttttt, CHRISTMAS is my favorite time of year.  I love all the red and green colors, I love how people actually take the time to see that people around them are hurting and in need, I love the Christmas music on the radio, I love how giving people are, I love focusing on Jesus Christ and his atoning sacrifice for us (which we should do year round), I love giving gifts, I love singing Christmas carols, I love shopping to find the perfect gift to make someone smile and feel that they are loved.  I just love CHRISTMAS time.  It's truly a joyous occasion.

So let's hop right into it.  This week's picture is from Lorinda and here is my color palette.

Christmas Ornaments:


Fabric and where I spotted them:

Berries & Blooms - Mistletoe Magic
Mary May  collection by Hoffman Fabrics

Starbursts
Aubade  collection by Michelle Engel Bencsko
for Cloud9 Fabrics

Starry Rhapsody
Holiday Inspirations  collection
from Fabric Traditions

Joyful Holiday Polka
Holly Jollies collection by Victoria Hutto
for Quilting Treasures

Circles & Swirls
Potpourri collection by Grace Pullen
for South Seas

 Birds & Pomegranates
Azuli collection by Julie Paschkis
for In The Beginning Fabrics

Chrysanthemum Petals
Changing Seasons collection by Ro Gregg of Paintbrush Studio
for Fabri-Quilt


Okay, okay!  I know the Birds & Pomegranates is not exactly Christmasy; but just look at them.  They are so cute, I just kept coming back to them.  I couldn't not include them.  They were calling out to me, over and over.  I simply had to include them.

Go check out Trina at In An Otter Life and Lorinda at Laural and Pine and see what cool color play palettes they came up with.

What craft or sewing project are you planning to make this Christmas.  Let me know, I'd love to read all about.

Goodbye for now loves, gotta finish making up this costume.  Who knew the whole year would breeze by before I could get started on our Halloween costumes.  Sigh.

Love and Shimmies,


Monday, October 26, 2015

Weekend of Palazzo Pants

Hello Hon,

I hope you are enjoying the beginning of the nice fall air.  I'm excited about today's post, I have wanted to try this for some time.  I hope you've got some fabric ready and that you enjoy this post as much as I enjoyed doing it.

During the summer I had a one week break from school.  The family decided to take an overnight road trip to spend a little quality time together.  I didn't have anything I wanted to wear since I had packed on a few 'stressed from math class' pounds during the last semester.  So I ran into the sewing room that Thursday night, because we were leaving Friday morning.  I was determined to whip up a quick pattern and make myself some of my favorite style of pants, PALAZZO!  4:30 a.m. Friday I had three pair of palazzo pants in knit fabrics.  I bought these fabrics months ago just for such a task.  I love the heavy weighted patterned knits for palazzo pants.

The pattern was simple.  I took a pair pants from a sweat suit I loved.  The pants had a good fit, not too tight but not too baggy either.

Creating the pattern:

  1.  First I taped some pattern paper to my cutting table.  NOTE:  I use wax paper, it’s cheaper that actual pattern drafting paper.  So is banner paper, brown paper used to wrap package for the mail, medical paper (that stuff they use on the medical examine table you climb on in the doctor's office), news papers taped together, even the backside of wrapping paper.
  2. Next I folded the pants in half and then I laid that side out flat (make sure it's nice and flat).  I traced to top, then the seat and down the inseam.  When I got to the mid-thigh area I start to draw my line straight down to the hem (in other words I did not follow the shape of favorite pants, I just made it more of a boxy look with the pattern I drew on the paper).  Then I traced the hem (do not worry about tracing the outside seam, it's not necessary)NOTE:  The fold is with the front of the pants folded to the inside creating a curved point at the seat of the pants.
  3. Added two inches to the top to make you waist band.     
  4. Then I carefully flip my favorite pants over to the other side.  Again making sure everyting is nice and flat.  NOTE:  you can draw that outside seam if you need a line to help you keep you pants lined up, I just eyeballed it. 
  5. Now trace around this side the same as you did in step 2, remembering to make a straight line down at mid-thigh like you did for the previous side.  
  6. Removed your favorite pants and returned them to the hanger in your closet. 
  7. Next I labeled one side front and the other side back. 
  8. On the side that I labeled backside, I measured in about an inch.  Cut that 1 inch off.  NOTE:  You can measure with a ruler from the top line of pants down to the point of that curve in the seat of the pants.  I eyeballed it.  
  9. That's it!  You now have yourself a quick and easy pattern, the rest of just finding cool ways of manipulating your pants to the shape(s) you desire.  
Now that you have a fabulous new quick pattern you can place that on your fabric.  NOTE:  I would make sure the fabric is folded so you only have to do the physical action of cutting it once.   However you like to cut your pattern pieces out just ensure that you have two pieces.  

Sewing the pattern: 

  1. Match the two backsides at the pointed part of the seat and pin up to top.  Now sew from the top down to the point of the seat.  Use a zig-zag stitch or if you machine has it the stretch stitch.  Don't forget to back-stitch at the start and end of the seam.  Then match the two front sides from the point of the seat and pin up to the top.  Now sew again as you just did for the back seat seam.  
  2. At this point you simply placed the inseams together and pin, making sure to match the seams at the seat together.  Then sew together from the bottom of one leg all to way around to the bottom of the other leg.  Again, using a zig-zag stitch or if you machine has it the stretch stitch and don't forget to back-stitch at the start and end of seam.  
The Waistband:  

  1. Measure around you waist.  NOTE:  Write that measurement down for quick reference (I'm forgetful, I have to write it down).
  2. Cut out a piece of elastic using your waist measurement (some people added 2 more inches. I have since stopped doing that, but please feel free to do so.  I found I really don't need the added inches when I sew the ends together.  If your's is too tight, then you will need to add that extra 2 inches to the elastic.)  The width of your elastic is your choice.  Because of my tummy size I like to use at least 1 to 2 inch wide elastics.  
  3. Overlap the ends of your elastic and sew them together using a zig-zag stitch or if you machine has it the stretch stitch.  Take this time to try on your waistband to make sure it's not too tight.  Again, if it is too tight add those two inches to the next piece and try again.  It should be a perfect fit after that.  NOTE:  Make sure to reinforce the stitches and the back-stitch at the beginning and end.
  4. Once your elastic is sewn together place the top of your pants through the center of the elastic.  
  5. Now fold your fabric over the elastic to make a casing.  I generally like to make my casings about 1/2 an inch bigger that my elastic, but this is up to you how big you want to make yours.  Then sew the casing closed using a zig-zag stitch or if you machine has it the stretch stitch, being careful not to hit your elastic.  That way it can move freely and you can adjust your pants as needed.  
Wala!  Flip you new pants right side out.  You've got yourself a stylish pair of pants.  Now you can play with the size of the bell in your leg shape.  You can make it bigger, you can taper some of it, or even make it more straight.  You can even make the leg wider.  It's completely up to you.  

These Palazzo pants were great!  I tried something a little different on each pair so I could see what I liked better.  The first pair was exactly as my pattern was (the black pair) and I did nothing to the hem.  Wonderful thing about knit is that it does NOT fray!  The second pair I serged the bottom of the legs (nope, I refused to try to hem knit at that time of morning) because they were white on the inside and it looked like the bottom was going to roll up a bit.  I felt if the bottom hem did roll up the underside would be very noticeable since the design on the fabric was purple, wine, gold and black (no white).  The third pair I made more of a box cut, unlike the other two which were cut with a slight curve on outside leg and a little deeper curve on inside leg (the green pair).  I did not serged the hem and they did roll just a tad bit.  However, it's okay because they are the same on both sides and because to the southwestern pattern design of the fabric, the slight roll of the hem adds to the look quite nicely.

I must say I love the way each pair of pants turned out!  They were a joy to wear over the weekend and felt super comfortable.  I had wanted to make these pants for a long time now.  I had bought several commercial patterns and still had not used them.  I really wanted the experience of making a pattern myself.  Nothing fancy just simply run to comfy causal to sporty style pants to dress up or dress down.  Sooooo, now that I have successful done that, I can go ahead and try some of my commercial patterns.  It's the same concept of how I felt about quilts.  I started hand quilting so I could say and know that I could do it that way, if I wanted to or had to.  Then I moved on to machine quilting and piecing.  I should also mention that I created yoga pants waistband for my Palazzo pants, because of my tummy size I just prefer that type of waistband.  I will do a write up tutorial with pictures for the waist band soon, I absolutely love it!

I hope you have a wonderful Halloween.  I love any reason to dress up and pretend.  Unfortunately this year I did not have the time to make our costumes as we had planned.  So we'll be heading to Party City and picking up whatever we can find and then I will agree to wear.  We always do couple costumes but this yea our youngest son wanted to join us so it was going to be a family costume event.  But we will see what we come up with, I'll definitely post pictures.  If you share you costumes on your blog, Facebook or Instagram please let me know so I can check them out!

I hope you found this quick and picture-less tutorial to be helpful, simple and inspiring.  I now present to you photos of my 'Weekend of Palazzo Pants' created for a weekend trip to Atlanta with the family.  However, I have gotten so much more out them!


The third pair was a solid black pair, unfortunately at the time of putting this up to the blog we were unable to find any pictures of me in those pants.  See, I have had one camera to break and it's replacements was lost and now my currently camera is uh, temporarily missing not in it's proper place at the time of upload, sigh.  The lost camera also included the original photos.  Luckily I had my husband used his camera on the gold and purple pants.  The pictures from the green pants are from 2 later events.  Not only does the lost camera and it's micro card have all the original pictures, it also included all the step by step pictures for a clear tutorial.  My honey loves to peek in the sewing room and take progression pictures of whatever project I am working on, that's how we have the picture above at least showing the pattern.  I've you would like to see a more detail tutorial on how to make you own Palazzo Pant patterns just shoot me an email or contact with at any of my social media: Twitter, Instagram or Facebook.  (the links are also at the top of the side bar to the right)

Thank you so much for stopping by, see ya soon!  I'll see you Friday for Color Play Friday, the picture this week is from Lorinda and it's Christmas-y,  YEAH!  I lovvvvvveeee this time of year.  So be sure to check in to see out cool color palette and dreamy fabric choices.

Love and Shimmies,


Friday, October 23, 2015

Color Play Friday: The Vault

Good Morning Hon,

T.G.I.F.  Thank Goodness It's Friday, happy dance, happy dance.

This should have been a restful weekend, after school deadlines of course.  But this weekend is Toastmasters conference.  Sigh, no rest after all.  But I only do those things that I enjoy (yeah, even school, for the most part, on a good day, yeahhhhhh).

Well, I do get to play a bit while joining Trina and Lorinda for Color Play Fridayyy (in my best Ed McMann voice).  Don't know what #colorplayfriday is all about, that's okay.  I'll cut you some slack.  As you work your way back here every week you'll be as excited as I am.  You know  quilters/sewers love ANY reason to play with fabric.  So, to briefly bring you up to speed, each week Trina over at In An Otter Life or Lorinda over at Laurel and Pine choose a picture from their shared Pinterest Color Play Friday board.  We each create a color palette for said picture.  But wait, there's more!  We get to go window shopping (that's what my grandma called it) for fabrics using our color palettes.  Of course, you can also use any fabric you may already have.  I just find it exciting to have another reason to drool over fabric I don't own, yet.  After we have chosen our fabric, we blog about it.  I stand amazed at how we each see or feel something different about the same picture.  These ladies have been doing this for a while.  They extended an invitation to others to join them.  It sounded like a fun time so I quickly hopped on board.  Now, you've been briefed, let's go check out everyone's Color Play Friday.  Since you're already here I'll go ahead and show you mine.

This week's picture had my feeling very soft and sultry and just a bit sassy.  Welllll, you know Friday's are date night.  I imagined the hubby and I taking a long stroll in some quaint little village in some romantic part of the world.  I'm wearing a long Stephsgotit original flowing full maxi shirt that's swaying in the soft evening breezes.  Hand in hand we walk trough the village streets ducking in and out of the most charming little quilt shops.  Finally, resting for a little dinner of comfort food, my honey LOVES pasta (that's practically all he had in the pantry when we got married).  As we sit here on the balcony, with the wind blowing in our hair, trying to keep my skirt from blowing up into the wind while sipping on a glass of sparkling grape juice we wait for the evening sun to set before us.  Ahh, this is the life.  I mean that would be the life.

Now that you have that lovely picture in mind and as we all begin to drool over some fabulous little village on the other side of the world, let me show you my color palette and fabric choices for the Vault:


You can find all these wonderful fabrics at the links below:

Blue Variety by Jo Morton 
for Andover Fabrics at Hamless Fabrics 

Mojito Deity Eden from Tula Pink's Eden fabric line 
for Westminster at Keepsake Quilting 

Turquoise by Valori Wells from In The Bloom Knit  

 Tonga Carnivale - Poppy Tonga from Carnivale Batik Collection 
by Timeless Treasures at Rossville Quilts 

Fusions® Bloom - Black

Red Dahlia Lord & Lady Fabric 
(Downton Abbey inspired)


Ummmm, next week I think I need to get out of my comfort zone more.  I also like brighter colors and multicolor fabric (though I've been somewhat into the earthy tones all my #ColorPlayFriday's).  I should definitely break the barrier and try a little sassy and punk next week, LOL.  This is such a great learning experience for me.  Who knew Friday's were not just for fun, but for learning more about myself, more about experimenting with colors and patterns, more about color values and much more.  Wow, I'm like all tingly inside.  Tee-hee, only a quilter.  

That's it for now lovies, I'll see you on the flip side, of Monday that is.  Don't forget Marvelous Monday darling.  I'm so stoked about how these worked out for me and how they can work for you to!

Love and Shimmies, 


Monday, October 19, 2015

MIM - Make-It-Monday: Candy Dispenser

Hello Hon,

It's another glorious Monday with the promises of new opportunities to find something you love and DO IT! 

We had a fabulous weekend with our sons and eldest daughter as we gathered to attend a retirement ceremony for our eldest son.  It was  a wonderful event!  We also got to spend some time with our eldest daughter who was also able to attend the event.  

If you follow me on Periscope (if you don't my handle is @stephsgotit) you will notice that I did not broadcast my #SGS - Sunday Goal Setting.  We were on the road driving back home most of the day therefore I did not get a chance to scope the live broadcast.  I will just check in next Sunday to report.  It's incredible how much that little action of saying something out loud to others helps to hold me accountable.  If you do not have Periscope I encourage you to check it out for yourself and see if it's something you like.  I love how personal connections are being made and that it's in real time.  It's an app you download on your IPhone, Ipad, or Android.  Sorry it won't be very useful for you on your desktop or laptop.  You can get a little snippet of it here.    

Well, it's that time for Make-It-Monday!  This week I have detail pictures and comments on how we made this awesome item for my husband when he was running for a district position in our Toastmasters district.  It was so much fun to make.  He began the process and I kinda carried it home for him and made it look presentable.  What is it you ask?!?!?

Candy Dispenser

We sat it on the table with all of his campaign information.  We filled it with candy and as candy was taken from the dispenser's mouth it was immediately replaced.  Once it was completely empty we would refill it, which was was only once after initially setting it up each day.   It lasted a long time and it held a variety of candies.  Since Halloween is coming up this may be very useful for the office or classroom.  When you have guest/visitors stop by your the room/office/home they can simply serve themselves.  Since the dish itself is a tube you can place it in any small area, even against the wall, on the floor or a table (we leaned it against the wall behind the campaign table).  You can decorate it to match your office/room or for Halloween.  

Here's a list of what you will need:

Poster mailing tube, any size you like, you can find them at any office supply store
Coping Saw
Keyhole Saw
Scrapbook adhesive, glue would work also
Grosgrain ribbon
Scrapbook paper (you could even used wrapping paper, newspaper or regular paper decorated by your kids)

A large variety of candy!

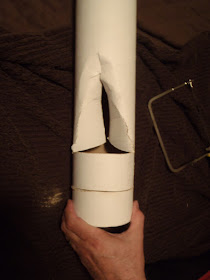
Start off by measuring up a couple of inches from one end of the tube.  We did about 4.5 inches.  There were no exact measurements as we made it up as we went along.  But you do want to start this slit up high enough because you will have another one about 2 inches below it to make the mouth. 


Saw through until your slit is about 2.5 inches long (from one end of the slit to the other, but no worries if you make it a little longer.  However, DO NOT saw over half way through the tube, that would be TOO FAR.  Think about what size candy you want to put in it to help determine the best width of your slits, we just guesstimated. Got it?  Great, proceed to next step.


That's my honey sawing.


At the original slit that you cut across the tube, measure about 2.5 inches down (this will bring you closer to the end of the tube).  Make another slit exactly like the first one going across the tub.  Make sure it it the same length as the first one because this will make the mouth of your dispenser.  


You see in these pictures that my husband made another slit above the mouth.  I did not tell you how to do that because it turned out to be unecessary.  Just like a man he was going to leave it like that.  But I could not have that, not on my watch.  So at that point where I come in to finish out the project and beautify it I actually closed the opening, as you will see if later picture.


Now take a keyhole saw or some small straight hand saw.  I am not sure but staring at this picture this may even be a sharp butter knife with little teeth (I know crazy, but yes our butter knifes have little teeth that actually cut).  shhhhhh, I can't say for sure but that is certainly what it looks like to me.  LOL  Anyway, at the end of the first slit cut all the way down to the second slit; that will create the side for you mouth.  Repeat on the other side.  Clear as mud right, thank goodness for pictures.


At this point you should have something that looks like this.

Don't worry, we're just staring, it'll look great
in the end product.


Ricola!  LOL, just a bit of fun.


Here's where I come in ensure functionality, stability, and to just put a woman's touch it.  So this is what it looked like when I started with my assignments on the dispenser.  

 
              You can see in these pictures that I closed that gap.


The next thing I wanted to do was make it presentable to general audiences.  So I went to my scrapbook stash and found this really cute paper.


I also grabbed my Snail Adhesive, my favorite when scrapbooking!


The paper is the size of regular printer paper.  I used the long side of the paper going down the tube, wrapping the short side around the tube.  To my disappointment it left a small gap in the back.  (Yes you can be smarter than me and measure the circumference and all that jazz.)  Considering this was going to be leaning against the wall and the mouth is on the front side I didn't worry about the gap in the back.  If it causes your OCD to kick in by all means measure the width of the gap, cut out strips of scrapbook paper and glue them into that space.  OR you could use 12x12 scrapbook paper, and cute off any excess.

Front Side
Back side


Now, you're probably asking what about the mouth.  First of all double check your opening, which I previously called your mouth, by measuring it.  Then draw those measurements on the paper.  Make sure that you have laid you paper against you tube to make sure you mouth will be in the proper place on you sheet of scrapbook paper.  Using a craft knife, cut out that rectangle.  Be careful NOT to go beyond the lines that you have drown so you mouth has nice clean corners and edges.    


Once you have that cut out, go ahead and place your adhesive on the back of the scrapbook paper and attach it to the tube.  Being careful to line up the mouth carefully.  


The last touch is find a coordinating or contrasting ribbon to match you paper.  Cut off a piece of ribbon that will wrap around the tube, overlapping by one or two inches.  Cut a small piece of ribbon one or two inches, it really depends on how big you want your bow.  I did ours about 2 inches.  Wrap this short string around your longer string, tie a knot, and finish with a bow.  (That's the cheaters way of make a bow for whatever your project is, leaving you with a great bow.)  Now you can glue you ribbon to you tube, I placed this one about 9 or so inches (again, no direct measurements, just where it aesthetically looks good to you).   Because you cut a little more than the size of the tube you should be able to overlap the ends with some added glue to close the ribbon circle.


And wa-la, you're done!  A great candy dispenser that will fill itself for hours.  When it's finally empty just open the top dump in more candy and let it go.  And if you are wondering if the candy just all came rushing out the answer is no.  Because you've left a little bowl (that's how I imagine the bottom, do not add a bowl) that the candy sits in.  The candy came out as needed easily but did not overspill at any point.  


Yumm yum yum yumm yummmmmm!


This is what it looked like at the event.  My husband was happy and it worked beautifully.  We are so good together.


That's it for today lovies, see ya next week for Marvelous Monday!!

Love and Shimmies,


Friday, October 16, 2015

Color Play Friday: Jellyfish

Good Morning Hon,

It's Friday, time to play with a fun picture and some color.

Although this week has not been any better than last week, I am more excited about the awesome photo posted of Lorinda's.  It a jellyfish who appears to be washed up on land.  If you remember last week I told you about Lorinda and Trina's offer to have others join them on their Color Play Friday's blog posts.  Each week a photo is chosen from their Color Play Friday pinterest board.  Each person has to chose a color palette for that picture.  Once you have your palette you have to chose the fabrics based on that color palette.  The ladies have opened the invitation up to all, so if sewing is not your media you can use yarn, scrapbook paper, paint, etc.   If you would like to join you may contact the ladies here and here.

I have always been fascinated with the dangerous beauty of jellyfish.  To me they are kind of, mystical.  Here we have one little guy washed up on rocky shores, probably wondering what the heck happened and how did he land up there.  More importantly how was he going to get himself home safely.  He takes a moment to rest and survey his surroundings.  At the same time I imagine he is plotting his escape from the rocky shores back into the his wonderfully spacious home.  At least that's how I imagine it.

I felt like the color scheme should be lots of neutral colors with just a bit of a pop, but still neutral.  I have been imagining what interesting quilt blocks I could make with the palette using the pop of color for sashing and borders.

Here is the picture and my color palette (I was in a hurry to finish so I did all the "shopping" for this colorplay on Fabric.com):


Brand Cotton + Steel
Designer Alexia Abegg

Brand Wilmington Prints

Brand Andover
Designer The Henley Studio

Brand Premier Prints


Brand Spechler-Vogel


Don't forget to check out Trina over at In An Otter Life and Lorinda over at Laurel and Pine to see what cool colorplays they came up with for the Jellyfish photo.

Have a great weekend, don't forget to catch Make-It-Monday.  We are enjoying our son's retirement event this week so there was not a Quilty Thursday, because I did not have a chance to work on the new blocks (they are announced separately and on different days).  Two weeks in and I'm already behind schedule, but not really.  I am so happy this is not a race and I am allowed to move at my own pace.

Love and Shimmies,


Monday, October 12, 2015

MMM - One Pan Oven Bake

Hello Hon,

I hope that this Monday has found you are enjoying a wonderful day.

Well it's another week, it's another opportunity to start over and try again.  Last week was rough.  It had me feeling some kind of way (I've been hearing that saying for a while and waiting for the opportunity to use it, teehee).

So let's talk about today, it's Mystery Meat Monday (MMM).   A couple of weeks ago the boys were out and I was home trying to figure out what to make for dinner.  The problem was I did't feel like making dinner.  But they have to eat right?  So I thought let's do something quick and make it a one pot wonder.  Ummm.  As I looked around I kept saying, "No, not that", "No, we had that already"....  Finally, I remembered something new we bought on the last shopping trip.  THAT'S IT!  Really, that was it.  I ran to the freezer and pulled it out.  I put it on the counter and thought okay great.  Well, that's not going to be enough all on its own.  So I walked to the refrigerator and grab something and placed it on the counter.  Then I went to the pantry and grabbed something and placed it on the counter.  This was repeated many times until I felt, that's enough.  But it didn't seem like the stove-top was the place to put these ingredients.  And then it hit me.  Bake it.  I grabbed a few more items and a casserole dish, turned on the oven and just started putting it together.  Making it up as I went along.

So now my lovies, I share that quick dinner bake on the spot recipe with you.  Why, because my guys ate it all, no complaints, and complimented on how good it was.  Even the teenager, who I did not tell some of the ingredients to, thought it was good.  So what is it?  Well I don't have a name for it yet, so we'll just refer to it as "One Pan Oven Bake".   Not only was it easy but there are only 6 ingredients.

Disclaimer ~ I took pictures of each step.  Why?  So I would not have to type a lot, and a picture is easily absorbed.  And because there are no measurements for you to have to follow.  Your welcome:

 I will type out the ingredients for you:


  • Daily Chef Steamable Normandy Blend (at Sam's, shhhhh don't tell the teenager)
  • Tyson Grilled Ready Chicken Breast Strips
  • Oscar Mayer Real Bacon Bits
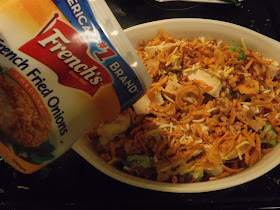
  • French's CHEDDAR French Fried Onions
  • Bertolli Four Cheese Rosa
  • Great Value Mild Cheddar & Monterey  Jack Shredded Cheese

Sundried Tomato Halves are in the picture, but I forgot to use them.  So, you can try them if you like.


 And you'll need you favorite baking dish.  I'm cooking for a small family so this was big enough and no one here really eats leftovers.  If you have a large family, you'll need double the ingredients and a bigger dish.  And a salad.
                                                                     

Preheat the oven at:


Follow the pictures from here:


Place in preheated oven and back for 29 minutes, originally.


Times up!


Now, although the chicken was pre-cooked, I still wanted it at poultry heating range.


So, I placed it back in the oven and increased the temperature. 

And sent the timer again.  

Times up, the second time.

Now that's the temperature for a thoroughly cooked chicken dish.
BAMM!  There is dinner hot and ready.  Got some healthy stuff in it, got some cheese, got some bacon, aaahhh, yummmmm!

That my dear, was one delicious dinner, per the boys of course.

I hope you get a chance to try it, come back and let me know how you liked it.  Of course, you can add more things to it that your family likes.  If you , let me know what!

Love and Shimmies,